
CE-Deploy field course · AI & CLI
Ask better questions.
Keep control of access.
Connect your assistant to CE-Deploy, check an important room, and understand the results.
Before you start
Start by checking one room.
You need CE-Deploy with AI & CLI Access, a connected organization, and a room you are allowed to check. If your organization is not connected, follow the setup guide first.
Use the AI tool you prefer. CE-Deploy’s CLI works with any assistant that can run commands on the CE-Deploy computer, including Codex/ChatGPT, Claude Code and GitHub Copilot. We use Codex/ChatGPT and Dots as examples, not requirements. The same access controls apply to every tool.
The main steps use plain-language prompts. Optional sections show how to run the commands yourself in Terminal or PowerShell.
Use your own room details. Example Corp and Boardroom East are fictional. Replace them in the prompts. Nothing on this page runs a command or creates a schedule.
Access is allowed for an organization, not just one room. Always check the selected device before continuing.
Begin Lesson 1 →Your learning path · About 105 minutes
Build confidence on one Room first.
Start with Lessons 1–4. Then try Dots or a supervised lab change if you need them.
Understand the gateway
Beginner · 10 min · No change
Open lesson →02RequiredConnect your AI assistant
Beginner · 20 min · Read only
Open lesson →03RequiredKnow what gets blocked
Beginner · 15 min · No change
Open lesson →04RequiredCheck one Room
Intermediate · 25 min · Read only
Open lesson →05OptionalRepeat checks with a dot
Intermediate · 15 min · Read only
Open lesson →06AdvancedMake a controlled change
Advanced · 20 min · Supervised change
Open lesson →Required · Beginner · 10 min · No change
Understand the gateway
Learn how your assistant uses CE-Deploy and how you control its access.
Start here. You do not need to run commands yet.
You can ask an AI assistant to check a room, compare settings, or help investigate a problem. The assistant runs commands through CE-Deploy and explains the results.
The gateway is the connection you switch on in CE-Deploy to allow those commands. It runs on your computer. The assistant needs access to that computer to use it.
You decide what is allowed
- Read only: the assistant can check information without changing devices.
- Read + write: the assistant can also make permitted changes.
- Write blocklist: commands and settings you have blocked stay blocked.
- Stop local gateway: turns off CLI access. CLI means command-line interface—the commands used in this course.
You do not need to share your tokens
CE-Deploy uses the Webex tokens and device passwords you have already saved in the app. Do not paste them into a chat or give the assistant credential files.
The assistant receives the information needed to answer your question. That may include private room or device details, so use an AI tool your organization allows.
More about the security
The gateway accepts local connections, checks each request, and uses an encrypted local connection file. It does not expose a public internet endpoint. These controls protect the CE-Deploy connection; they do not prevent software with broad computer access from using other apps or files.
Try it
Select AI & CLI Access at the top of the CE-Deploy window. Find Gateway, Organization access, Write blocklist, and Connect your tool. Leave write access off.
Before you move on
You can explain what Read only allows and where to turn access off.
Does adding a skill give the assistant permission to use your devices?
Reveal the answer
No. A skill teaches the assistant how to use CE-Deploy. You still choose which organizations it can access and what it may do.
Required · Beginner · 20 min · Read only
Connect your AI assistant
Let your assistant use CE-Deploy, then check that it has the right organization.
You know how access is controlled. Have one connected organization you are allowed to use.
We use Codex and ChatGPT for the setup examples. You can use Claude Code, GitHub Copilot or another assistant with the same CE-Deploy commands. It needs permission to run commands on the same computer and computer account as CE-Deploy. A chat without that access cannot use the local gateway.
1. Turn on read-only access
- Open AI & CLI Access → Organization access.
- Choose your training organization, select Read only, then Save access.
- Open Gateway and select Start local gateway. Keep CE-Deploy open.
Access lasts 30 minutes by default. If it expires while you read, start the gateway again before the next exercise. Refresh access checks the status; it does not add more time.
2. Ask your assistant to find the commands
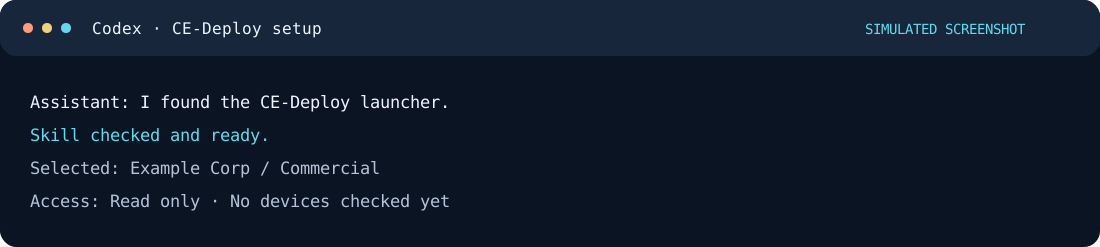
Find the CE-Deploy command launcher on this computer. Read its help, version and AI guide. Tell me whether you can use it. Use the full launcher path for your commands. Do not read credential files, change access settings, or check devices yet.
If it cannot find the launcher, open AI & CLI Access → Connect your tool. Under Terminal, select Copy command. Check the installation path before giving it to your assistant: Windows shows an example path you must replace, and the macOS example assumes the app is in Applications. Use the launcher inside the same installed app you have open. You can also select Open CLI & AI guide there.
3. Add the supplied skill, if you want
A skill saves you from explaining the workflow in every chat. It is optional; the assistant can read the AI guide instead. The prompt below is a Codex example.
Add CE-Deploy’s bundled ce-deploy-access skill to this Codex project. Use the CLI’s skill export and compatibility check. Keep the whole bundle together. If there is no project folder, ask me where to put it. Do not overwrite an existing skill without asking. Tell me whether the skill is available and compatible. Do not check devices yet.
Skill setup differs between tools. If you use Claude Code, Copilot or another assistant, follow its instructions for adding a skill, or ask it to read CE-Deploy’s ai guide. The CLI commands and CE-Deploy permissions are the same either way.
4. Choose the organization
List the organizations I have allowed in CE-Deploy. Ask me which one to use, then select it and show me its name and environment, such as Commercial or FedRAMP. If names are similar, ask me to confirm. Do not check devices yet.
Check the answer: it must name the organization you intended. Changing the organization shown in the CE-Deploy window does not change the assistant’s choice.
On a narrow screen, swipe the image sideways to read it.
Run the commands yourself (optional)
Open Terminal on macOS or PowerShell on Windows. Use the block for your computer. Replace example installation paths with your actual path.
macOS:
"/Applications/CE-Deploy.app/Contents/Resources/cli/ce-deploy" --help --json
ce-deploy() { "/Applications/CE-Deploy.app/Contents/Resources/cli/ce-deploy" "$@"; }
Windows PowerShell:
& "C:\path\to\CE-Deploy\resources\cli\ce-deploy.cmd" --help --json
$ceDeployCli = "C:\path\to\CE-Deploy\resources\cli\ce-deploy.cmd"
function ce-deploy { & $ceDeployCli @args }
These shortcuts work only in that terminal window. The following examples use ce-deploy as the shortcut. Run one line at a time and replace uppercase placeholders before continuing.
ce-deploy organizations list --json
ce-deploy context select --organization ORG_REF --json
ce-deploy context get --context CONTEXT_REF --json
Find the organization in result.organizations. Copy its organizationRef in place of ORG_REF. The selection reply returns result.contextRef; use that in place of CONTEXT_REF in later commands. It tells CE-Deploy which organization you chose.
If the list has more pages, use its nextCursor in organizations list --cursor CURSOR --json until complete is true.
For a local Codex project, create the .agents/skills parent folder first, then export to a new folder:
ce-deploy ai skill export --output .agents/skills/ce-deploy-access --json
ce-deploy ai skill check --file .agents/skills/ce-deploy-access/compatibility.json --json
Keep SKILL.md, compatibility.json and the references folder together. Check again after an app upgrade. If the new skill does not appear, restart Codex.
If you get stuck
- Launcher not found: copy the path from Connect your tool.
- Organization missing: check that it is connected and that you saved Read only access.
- App unavailable: keep CE-Deploy open and check that the gateway is running.
OpenAI’s skill setup guide · Claude Code · Copilot CLI
Before you move on
The assistant can use the launcher and has shown the correct organization and environment.
The assistant selected a different organization from the one you intended. What should you do?
Reveal the answer
Stop and ask it to select the correct organization before checking any devices.
Required · Beginner · 15 min · No change
Know what gets blocked
Understand why CE-Deploy may refuse a command and what to do next.
You have connected the assistant and checked its chosen organization. Leave it on Read only.
CE-Deploy checks whether a command is allowed before it runs. The assistant cannot grant itself permission through the CLI.
Three reasons a command may be refused
- Access is off or has expired. Check the gateway in CE-Deploy.
- The organization is Read only. The assistant can check information, but cannot change a device.
- The action is blocked. The saved Write blocklist prevents it, even when Read + write is enabled.
Some commands also cannot be used as read-only checks. A command called “Get” or “List” is not automatically safe. If it is refused, the assistant should find an allowed way to read the information or explain what it could not check.
Review your blocked commands
Open AI & CLI Access → Write blocklist. Each entry shows an action name and its command or setting. Starter entries include factory reset, reboot and log deletion. Your saved list may differ.
For this lesson, look for the reboot entry. If it is absent, note that rather than assuming it is blocked. Do not run it or edit the list.
On a narrow screen, swipe the image sideways to read it.
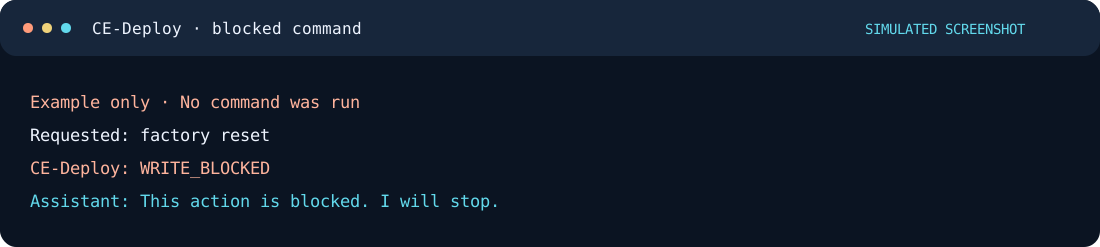
A rule can block one command, a whole group of settings, or an action only when particular options are used. For example, deleting logs can be blocked while stopping logging without deletion remains allowed.
If you need to edit the blocklist later
Make policy changes deliberately in the app, separately from a refused task. Finish an edit with Apply to draft, then select Save changes. Until you save, the active list stays the same.
Restore starter list prepares recommended additions for review. Save changes applies them. The list applies to all AI/CLI organizations. Existing saved lists are kept; an unreadable policy blocks writes.
An exact rule blocks the named path. A subtree rule also blocks paths below it. Conditions can limit a rule to particular parameter or setting values.
Read + write is permission to make allowed changes. CE-Deploy does not show a separate approval box for every job, so leave it off until you need it.
Before you move on
You know to stop and explain a refused command rather than work around it.
If a reset is blocked, should the assistant try a direct connection to the device?
Reveal the answer
No. It should report the block and stop. Any deliberate policy change belongs in CE-Deploy under your control.
Required · Intermediate · 25 min · Read only
Check one Room
Check the right device and save a useful report.
You have completed setup and understand why commands may be refused. Choose one room you are allowed to check.
Example: people report quiet audio in Boardroom East before important meetings. Check its volume settings without changing them.
Replace Boardroom East and Example Corp with your own room and organization in the prompts below.
1. Find the right device
- Keep CE-Deploy open and check that the gateway is running. Start it again if access has expired.
- Ask the assistant to select your organization again if needed.
- Give it the room name. Ask it to show the matching device before reading its settings.
In Example Corp / Commercial, find Boardroom East. Show me the matching device’s name and model so I can confirm it. If more than one device matches, ask me which one to use. Do not check other rooms or change anything.
Check the name and model in the reply. If the model is unavailable, confirm the Device ID instead. If the device is wrong, stop and correct the choice. If you already know the Device ID, give that to the assistant to help it find the right device.
2. Read the volume settings
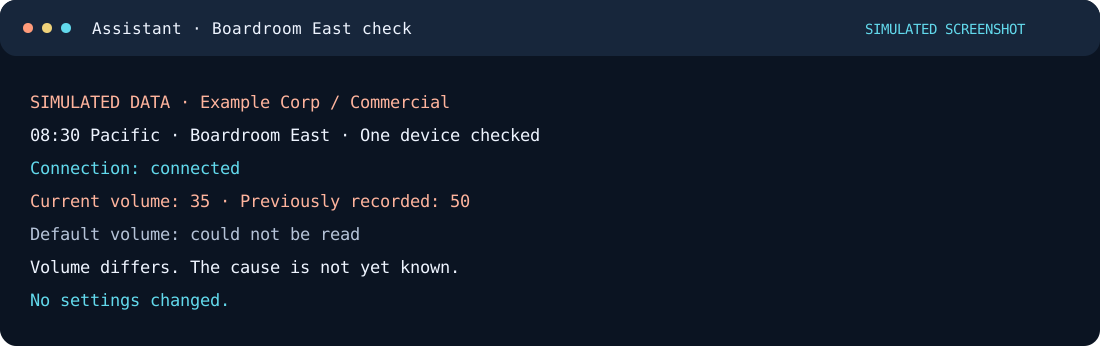
Check the device I just confirmed. Report its connection status, current volume and default volume using CE-Deploy. Wait for the check to finish and include all results. Tell me which checks failed or returned no value. Do not change settings or reboot the device.
Current volume is the volume reported now. Default volume is a saved setting. They are different values; a change to one does not prove the other changed.
3. Read the answer carefully
A useful answer names the room, says when it was checked, shows the returned values, and lists anything the assistant could not check. A failed read does not prove the device is offline.
On a narrow screen, swipe the image sideways to read it.
4. Save the report for next time
Keep a dated note with the organization, room, Device ID, returned values and failed checks. Store it somewhere your organization allows.
If this is your first check, say so. You can compare later checks with it, but do not call a faulty room’s settings “known good.” Ask the room’s owner which earlier report or working setup to use for comparison.
The assistant can spot a changed value. It cannot prove what people hear in the room. An attended audio test may still be needed.
Run the commands yourself (optional)
Use the organization you selected in Lesson 2. Replace CONTEXT_REF with the value returned there. To find the room, list its devices:
ce-deploy devices list --context CONTEXT_REF --jsonIn result.devices, find the room’s displayName and check its model. Copy that row’s deviceRef in place of DEVICE_ID below. If the name matches more than one device, ask which is correct.
If the list has another page, run devices list --context CONTEXT_REF --cursor CURSOR --json with the returned nextCursor. Repeat until complete is true.
ce-deploy devices list --context CONTEXT_REF --device-id DEVICE_ID --json
ce-deploy xapi search --query "audio volume" --json
ce-deploy xapi schema --operation Status:Audio.Volume --json
ce-deploy xapi schema --operation Configuration:Audio.DefaultVolume --json
The first command should return only your chosen device. When its list is complete, copy result.selectionRef into the JSON below. This tells the read request which device to use. The schema commands describe the two readings. The device may still refuse a read or lack that setting; report that rather than treating it as a completed check.
Save this as query.json in your terminal’s current folder. Use a plain-text editor; on Windows, make sure the filename does not end in .txt.
{
  "selectionRef": "SELECTION_REF",
  "requests": [
    {
      "type": "Status",
      "path": "Audio.Volume"
    },
    {
      "type": "Configuration",
      "path": "Audio.DefaultVolume"
    }
  ]
}
Replace UNIQUE_REQUEST_ID with a new label, such as room-check-001. Run the first line, then copy its result.queryRef into QUERY_REF for the next line.
ce-deploy queries submit --context CONTEXT_REF --request-id UNIQUE_REQUEST_ID --file query.json --json
ce-deploy queries results QUERY_REF --wait 5 --json
For later pages, use the last returned nextCursor in place of CURSOR:
ce-deploy queries results QUERY_REF --wait 5 --cursor CURSOR --jsonKeep collecting pages until the job is completed or cancelled and deliveryComplete is true. An empty page while the job is running is not the end. Check both readings and report errors or missing values separately.
Keep the request ID, file and returned job reference. If the connection drops, collect the existing job’s results where possible rather than blindly starting it again. If CE-Deploy restarts and the results are lost, ask whether a fresh check is wanted.
Before you move on
You checked the right device, received at least one reading, and saved the results and failed checks. If no readings worked, resolve that before setting up repeated checks.
The volume differs from an earlier report. Has the assistant proved why the room sounds quiet?
Reveal the answer
No. It found a difference, not a proven cause. Share the values and failed checks, then investigate further.
Optional · Intermediate · 15 min · Read only
Repeat checks with a dot
Use the check you just learned while you are away from your computer.
You have checked one room in Lesson 4 and saved its report.
We use Dots, ChatGPT’s assistant offering, for this example. With computer access, a dot can arrange checks on your CE-Deploy computer when you message it from elsewhere or ask for a schedule.
Other providers may call their features agents, assistants, remote control or scheduled tasks. For example, Claude Code’s Remote Control lets you continue a local session from another device. Remote access and scheduling are separate features; check which your tool supports. The same CE-Deploy CLI and access rules still apply.
First complete Lesson 4 and save its report. Give your assistant the same organization and Device ID so it checks the same room. The steps below show the Dots setup.
1. Connect the computer
- On the CE-Deploy computer, open your dot’s profile in ChatGPT.
- Under Computers → Your computer, select Allow access and review the confirmation.
- Keep the computer awake and online, with ChatGPT and CE-Deploy open.
- In CE-Deploy, save Read only for the organization and start the gateway.
This depends on the features and permissions available to your account. Connecting your computer to another ChatGPT tool does not automatically give your dot access.
2. Try one check from your phone
Use the connected CE-Deploy computer to check the room in my saved Lesson 4 report. Ask me for the report’s location if you do not have it. Use the same organization and Device ID. Report connection status, current volume, default volume and anything you could not read. Do not change devices, read credentials or turn on access yourself.
Check the reply against your saved report. Make sure it checked the same device and included the time.
3. Add a schedule, if useful
Check that same room at 08:30 America/Los_Angeles on the next five weekdays. Show me the dates and confirm the saved schedule. Compare with my saved report; say if there is no earlier report to compare. Notify me in ChatGPT only when something changes, a check fails or you need my help. Include the check time. Do not change settings or turn on access. Stop after the fifth scheduled day.
Review the saved task in Scheduled and check the first run. Give the task the room details and report location; do not assume a new task knows everything from another chat.
In AI & CLI Access → Gateway, choose a Gateway duration and select Save duration. The choices are 30 minutes, 1 hour, 4 hours, 8 hours, or Until CE-Deploy quits. If stopped, select Start local gateway. If already running, Restart with saved duration applies the new choice; ask the assistant to reconnect afterward. Refresh does not renew access.
Leave the organization on Read only while you are away. CE-Deploy provides no scheduled-write mode, but a local assistant could still use shared Read + write access if you leave it enabled.
When monitoring ends
Cancel the schedule in Scheduled and stop the gateway. If the dot no longer needs your computer, revoke its computer access separately.
OpenAI guides: Connect your computer · Recurring tasks
Before you move on
You have checked the room remotely. If you added a schedule, you reviewed it and checked its first run. Skip this lesson if you do not need Dots.
The dot could not reach your computer. Is the room offline?
Reveal the answer
You do not know yet. The check could not run. The dot should say that and show when the room was last successfully checked.
Advanced · 20 min · Supervised change
Make a controlled change
Review one small change, check the result, and turn write access off afterward.
You can check one device and read a setting. Have a lab device and permission for the proposed change.
Use a lab device and an agreed change window. You can finish this lesson by preparing a plan without changing a device. You do not need to complete the Dots lesson first.
Example: the person responsible for the lab asks you to set its default volume to 50. This is practice, not a proposed fix for Boardroom East.
1. Ask for a plan first
Prepare a plan to set the default volume to 50 on my approved lab device. Ask me for its organization and Device ID. Read its current default volume, then show me the device, old value, proposed value and how you will check and restore it. Wait for my approval before submitting a change. Do not enable access or remove blocks.
Check the device and values. If the setting is already 50, there is nothing to change. If the original value cannot be read, stop and agree on a recovery plan before continuing.
2. Allow the reviewed change
When you are ready, open AI & CLI Access → Organization access, choose Read + write for that organization, and select Save access. Review the Write blocklist and check that the gateway is running. Ask the assistant to select the organization and device again after this permission change, then carry out the agreed plan.
If the app says write execution is disabled, stop here and keep the exercise as a plan. CE-Deploy does not ask for approval again for each job. Permission settings are the real control; the instruction to wait is part of your conversation with the assistant.
3. Check what happened
Ask the assistant to collect all results, then read the default volume again on the same device. Open History at the top of CE-Deploy. Find the entry for your change, labeled AI / CLI, and select its row to view the details. Match its time and room to your change.
- Acknowledged: check the setting again before calling the change successful.
- Error: inspect the result and do not assume nothing changed.
- Unknown: the change may have reached the device. Investigate; do not automatically run it again.
Stopping a job prevents remaining work where possible. It cannot undo a change already sent. Restoring the old value is a separate change to review and check.
4. Turn write access off
In Organization access, choose Read only again and select Save access. To remove access entirely, choose Disabled and save it. In Gateway, select Stop local gateway when finished. Record the old value, requested change, returned results and readback in your report.
Run the commands yourself (optional)
Use Lesson 4 to select one device and read Configuration:Audio.DefaultVolume. Inspect the schema and show the proposed request before enabling writes. After saving Read + write, repeat context select, context get and the one-device listing from Lessons 2 and 4. Use the newly returned context and selection references, and confirm writeExecutionEnabled: true in the connected app’s reply.
Save the reviewed request as change.json, replacing SELECTION_REF with the value from a completed one-device listing:
{
  "selectionRef": "SELECTION_REF",
  "operations": [
    {
      "type": "Configuration",
      "path": "Audio.DefaultVolume",
      "value": 50
    }
  ]
}
Use a unique request ID for this new change. Copy result.jobRef from the submission reply into JOB_REF.
ce-deploy writes submit --context CONTEXT_REF --request-id UNIQUE_REQUEST_ID --file change.json --json
ce-deploy writes status JOB_REF --context CONTEXT_REF --json
ce-deploy writes results JOB_REF --context CONTEXT_REF --wait 5 --json
Wait until the job stops, then use each returned nextCursor with --cursor CURSOR to collect every page until deliveryComplete is true. Account for every requested change.
Read back the setting with a new read request ID and the Lesson 4 commands, using this JSON:
{
  "selectionRef": "SELECTION_REF",
  "requests": [
    {
      "type": "Configuration",
      "path": "Audio.DefaultVolume"
    }
  ]
}
To request a stop, first check the connected app reports writeCancellationSupported: true, then use:
ce-deploy writes cancel JOB_REF --context CONTEXT_REF --jsonKeep the original request ID, exact file and job reference if a reply is lost. Inspect the existing job rather than starting another. History repair only repairs local records; it does not resend commands or prove a device’s state.
Before you move on
You have a reviewed plan. If you carried it out, you checked the setting afterward and turned write access off.
The change timed out. Should you send it again straight away?
Reveal the answer
No. Keep the original request details, check its results and read the setting back. The first request may already have changed the device.
Finish here, or keep practicing.
Lessons 1–4 give you a complete read-only workflow. Dots and device changes are optional. Keep your room report, cancel any schedules you no longer need, and stop the gateway when finished.
The completion buttons track your learning. They do not confirm that a device check or change succeeded.
Return to the lessons ↑Updated 26 October 2026
Simulated screenshots use made-up names and results. Check the current help and AI guide in your installed CE-Deploy app when following the command examples.